Join 164 other subscribers
ryan dematera, mfa
education & design
Category Archives: ET Review
BP9 RISE Comment and Link on RILS: GarageBand and Oovoo
Posted by on June 23, 2012
Making Music in Garage Band
While digging around ES, I noticed Lewis Patton’s RILS on Making Music with GarageBand. Music software has always fascinated me since I used to major in music. If you are a musician or like to play around with audio tracks then I suggest that you take a look at this. His RILS is at http://educatorstudio.com/lessons/making-music-garage-band and also posted to his blog.
My comment URL is:
http://educationtechnologydotme.wordpress.com/2012/06/20/bp7-making-music-in-garage-band/#comment-10
Moving on….
Teach Me How to Oovoo
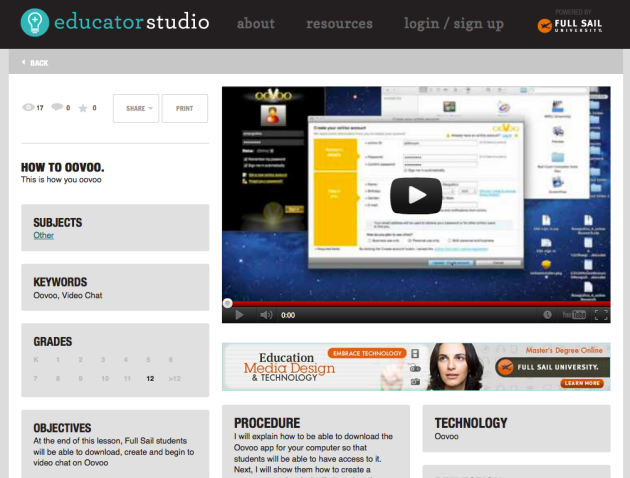
Another RILS that got my attention was Anthony’s Teach Me How to Oovoo. His scenario is about showing others how to set up a video chat account and use Oovoo. Check it out to learn about another video chat application that is available online. His scenario is published on ES at educatorstudio.com/lessons/how-oovoo and on his blog.
My comment to his publication is attached to his blog at:
http://amangiafico12.wordpress.com/2012/06/20/teach-me-how-to-oovoo/#comment-26
BP6 RILS First Trial Run: Mikons exercise
Posted by on June 10, 2012
YAY! I’m going to be making my first course soon!!….oops…
First thing that I would like to discuss is what my RILS is about. As of last night, my scenario was going to be about designing a logo. After I had submitted my RILS plan, even though I thought the plan was good, I felt that there was too much material and may be more appropriate as an ongoing exercise used throughout a single course. From this point forward, I will be trimming down the scenario to make learning objectives more digestible. This scenario is going from an experience using a design process to an experiment with tools that are present in most illustration applications that are on the market. The value of this scenario is that learners will understand basic shapes used in art and design. They will also be able to adapt what they learn from Mikon’s user interface to be able to learn how to operate other illustration applications such as Photoshop, Illustrator, CorelDraw, Inkscape, or GIMP.
New RILS Summary as of 6/10/12
- Introduce learners to Mikon (interface and tools)
- Demonstrate process and tools for creating asset
- Play Activity. Learners create their own asset.
- Share Activity. Learners share their creations and discuss.
And now our first test subject: Vin Ryan MFA
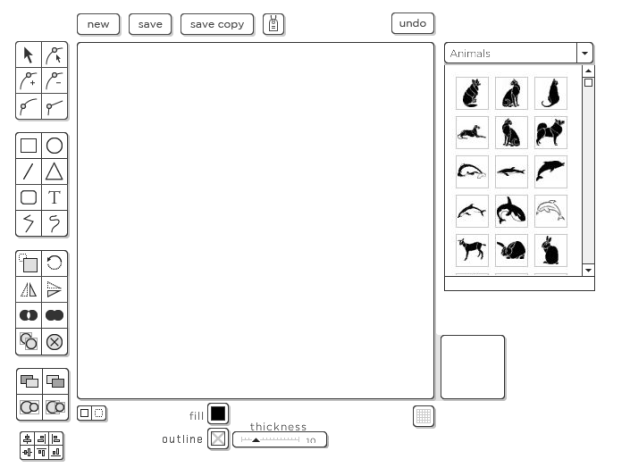
As a learner, the first thing that I did was look for what tools that I would definitely use. I had already decided that I was going to play around with circles. Since I knew I would have to reposition objects, I knew I would also need a selection tool which was very obvious at the top left corner. I was pleased to discover that there were alignment tools. The following image shows the interface.
Okay. this is great. now what…
Once I had hovered over each tool and gotten a feel for the interface, I dove in. I selected the circle tool and nine circles later, I came up with this….
Are we there yet?!
I then selected all circles and clicked the alignment tools to get my first draft of my logo. It’s a bullseye!
Moving on…
As the learner, doing exercises like this seem very mundane to me sometimes. However, I am always surprised with what can be accomplished when a design is very simple. As the instructional designer, changes that I may implement may be offering more specific design suggestions or examples to learners. I feel that some learners will feel overwhelmed when given too much freedom on what to create. The best example where I experienced feeling overwhelmed by choice, was when I had to illustrate a car. There were so many makes and models to choose from. But I maybe I’ll discuss that some other time….
BP 5 RILS tech: Mikons!
Posted by on June 10, 2012
Mikons logo. © 2006-2008 mikons.com
Mikons is another emerging technology that I will be using for my RILS. Mikons is a website that allows users to create visual identities such as logos, badges, or emblems.
To allow users to create visual identities, Mikons.com has an online illustration application that is integrated into the website. The user interface seems clean and simple to me. Personally, I found the interface easy to navigate. However, I was a bit unnerved how often my cursor would seem to disappear as I moved around and selected tools while working. But I suppose you get what you pay for – at this time, users do not have to pay to use this application.
While I was trying this application out. The first thing that I did was to take a mental note of what tools were present. I immediately noticed some tools that I always use on other design programs such as those from Adobe Creative Suite. A sample of some tools that I noticed was a selection tool, shapes tools, alignment, and a morph tool. For users familiar with bezier curves and freehand, those two tools are also available.
One thing that I do not like about this application is that I feel that new learners will have problems using this application because it has some glitches. This interface may be confusing for new learners, but earlier parts of the RILS should address this issue by introducing the application and demonstration. This will have to be a video that breaks down the sections of the interface and identifying tools the learners are suggested to use. Learners will also have to have a demonstration of the steps to use this application from logging in, creating the logo, and finally saving the file.
BP4: RISE Commenting/Linking Part 2 and xtranormal.com
Posted by on June 6, 2012
UNCRASHABLE TEST DUMMIEZ from Xtranormal.com
Anthony found a wonderful web application that allows users to create motion graphics (videos) online. The software features predefined objects which would allow users to create a motion graphic relatively quickly and easily. Predefined objects that I noticed are backgrounds, actors, sound effects, and music. Looking closer at the designers interface, I noticed other tools which blew me away such as camera angles and being able to select facial expressions. If you have not checked it out, you can log in to Xtranormal using your login credentials from another service such as Facebook or Google.
Also check out Anthony’s post at http://amangiafico12.wordpress.com/2012/06/03/bp2-xtranormal/
BP3: RISE Commenting/Linking Part 1 and bubbl.us
Posted by on June 6, 2012
Hey folks,
I recently read Judy Ward’s BP2 post that features a brainstorming application on bubbl.us. One of the reasons that I chose from Judy’s blog is that I have never used an application specifically for brainstorming but illustration programs. In my opinion, illustration programs are not ideal for putting down ideas quickly and easily since they are very top-heavy in terms of features.
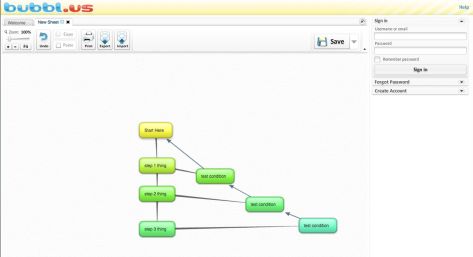
Just to give you an idea on how easy this application is to figure out and use, the following infographic is a flowchart I tossed together. From the point, I initially access the website to the point I took the following screenshot only took a few minutes.
I invite you all to check out Judy’s blog if you have not yet. Her ET Review is available at the following URL:
http://medprofblog.wordpress.com/2012/06/03/et-review-2/
http://medprofblog.wordpress.com/2012/06/03/et-review-2/comment-page-1/#comment-5
Enjoy!
ETR: Blippar
Posted by on May 4, 2012
The Go2Web20 website itself is a wonderful tool for me to use. As one interested in teaching production and strategic design, this website saves me a great deal of time to find tools useful in and out of the classroom. I am constantly looking for new tools to benefit myself or others. Just to stay in context of this exercise, one of the tools caught my attention was blippar.
Meet blippar
Blippar is defined as a “mobile augmented reality and image recognition platform.” Blippar is a free smartphone application for both iOS (Apple iPhone/iPad) and Android platforms.
So what is blippar good for?
As demonstrated in the video, through the use of the mobile phone’s camera, blippar identifies an advertiser’s object and provides online content. The advertiser’s object could be one of their products or print advertising. Content that is demonstrated adds to a user’s experience. Prior to discovering blippar, I experienced advertising in just print and the web via less mobile platforms such as desktops and laptops. Now one could pull up a game or online promotions that hook the viewer on a particular brand or product. One aspect of blippar that I appreciate is how this application allows an advertiser to combine user interaction and three-dimensional rendering to immerse the user in a unique experience.
This is awesome, but…
Some of you may be wondering what on earth would be the value of blippar to a graphic or media design educator? Obviously, some students may not have the will, time, nor money, to create online promotions for mobile devices. To me, blippar or a similar application would be something that I would like to introduce to future students or colleagues on what media channels are available for informational purposes. As I briefly mentioned earlier, I had only experienced advertising in print and online. As a graphic design student, I had to look at the works of art and design of others. In some ways, I am looking at selections of work from a historical sense. In other cases, I am seeking out trends and styles.
But in most cases, I would turn the question around a bit. I would ask the student, what does this do for you?
To me, this is all about inspiration.
Reference


You must be logged in to post a comment.